How to get Puppet with Foreman GUI- an alternative to Puppet Enterprise & Puppet Razor on GCP(Google Cloud Platform)
This section describes how to launch and connect to Puppet Foreman in a Google Compute environment using the available Cloud Launcher offering.
Note: The Foreman VM will be able to manage Puppet hosts within the same GCP project as the VM. So make sure that you deploy the VM in the desired project and on default network
- Open **Puppet with Foreman GUI- an alternative to Puppet Enterprise & Puppet Razor ** listing on GCP Marketplace
- Click Launch.
-
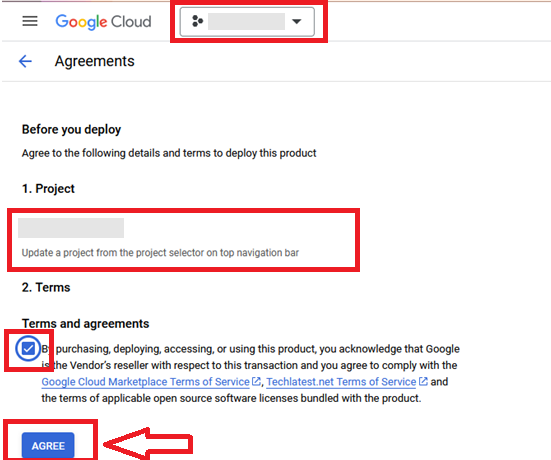
It will take you to the agreement page. On this page, you can change the project from the project selector on top navigator bar as shown in the below screenshot.
-
Accept the Terms and agreements by ticking the checkbox and clicking on the AGREE button.
-
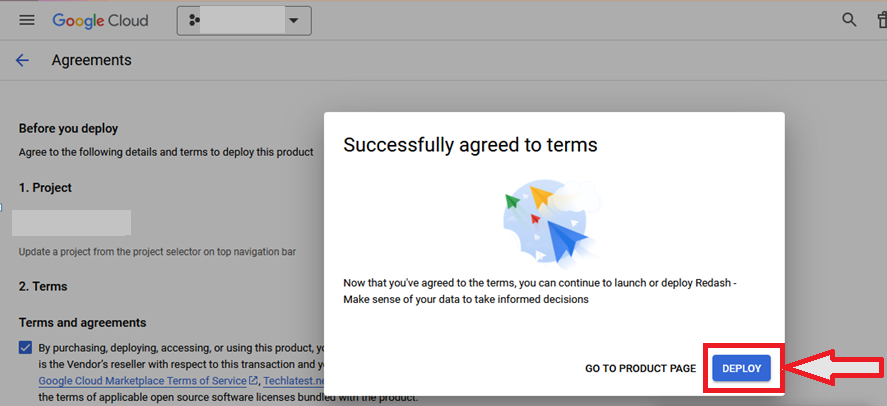
It will show you the successfully agreed popup page. Click on Deploy.
-
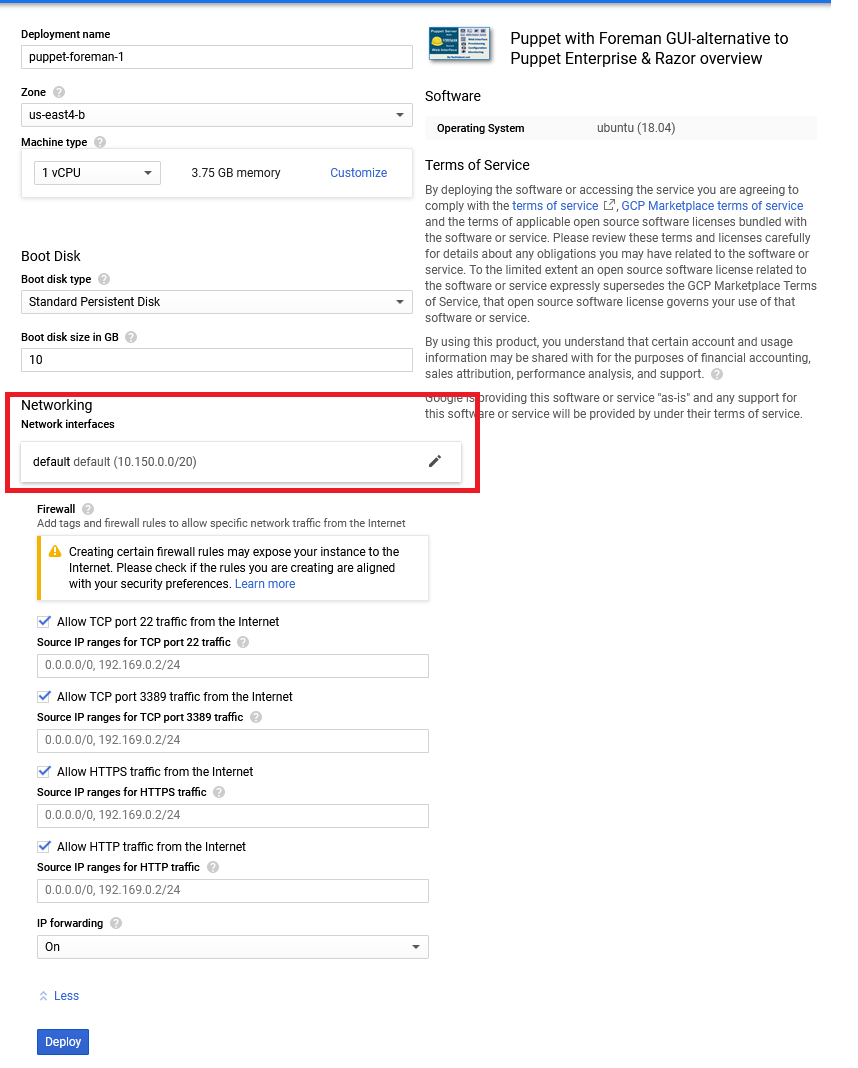
On deployment page, give a name to your deployment.
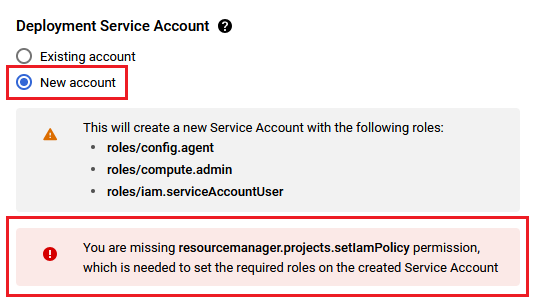
- In Deployment Service Account section, click on Existing radio button and Choose a service account from the Select a Service Account dropdown.
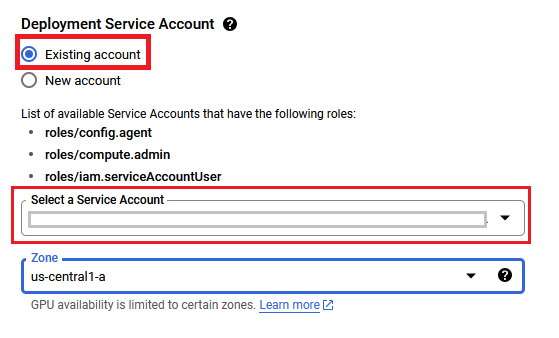
- If you don't see any service account in dropdown, then change the radio button to New Account and create the new service account here.
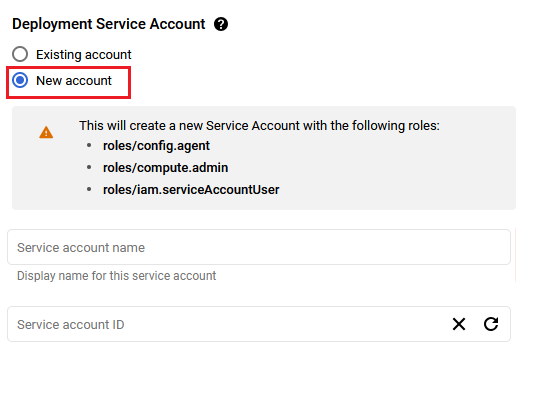
- If after selecting New Account option, you get below permission error message then please reach out to your GCP admin to create service account by following Step by step guide to create GCP Service Account and then refresh this deployment page once the service account is created, it should be available in the dropdown.
You are missing resourcemanager.projects.setIamPolicy permission, which is needed to set the required roles on the created Service Account
- Select a zone where you want to launch the VM(such as us-east1-)
- Optionally change the number of cores and amount of memory. ( This defaults to 1 vCPUs and 3.75 GB ram)
- Optionally change the boot disk type and size. (This defaults to ‘Standard Persistent Disk’ and 10 GB respectively)
- Optionally change the network name and subnetwork names. Be sure that whichever network you specify has ports 22 (for ssh), 3389 (for RDP), 80 (for HTTP) and 443 (for HTTPS) (Please Select the default network here as shown below) exposed.
- Click Deploy when you are done.
- Puppet with Foreman GUI- an alternative to Puppet Enterprise & Puppet Razor will begin deploying.
-
A summary page displays when the compute engine is successfully deployed. Click on the Instance link to go to the instance page .
-
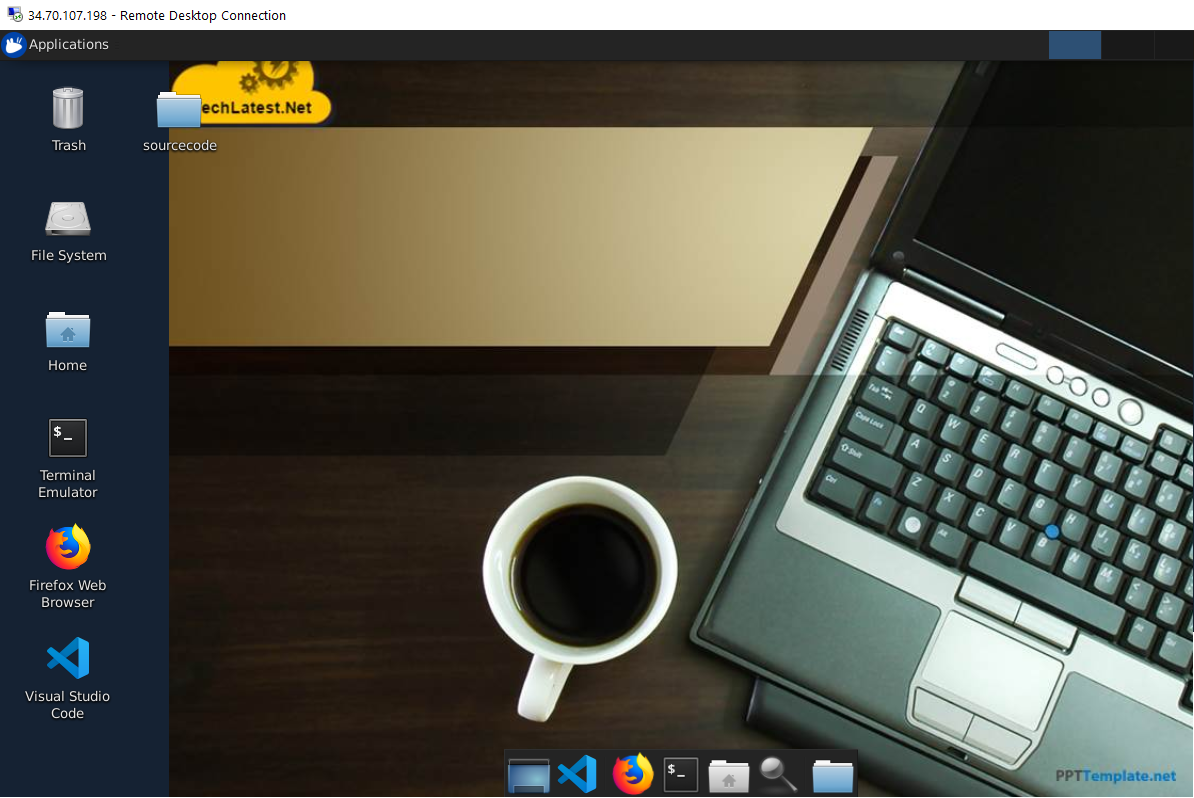
On the instance page, click on the “SSH” button, select “Open in browser window”.
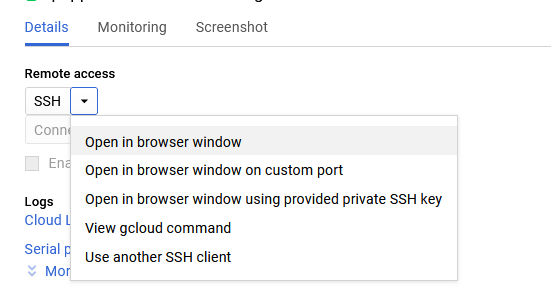
- This will open SSH window in a browser.
- Run below command to set the password for “ubuntu” user
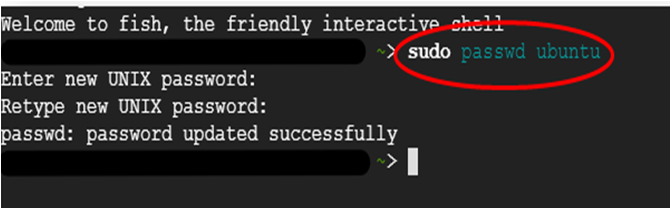
-
Now the password for ubuntu user is set, you can connect to the VM’s desktop environment from any local windows machine using RDP or linux machine using Remmina.
-
To connect using RDP via Windows machine, first note the external IP of the VM from VM details page as highlighted below
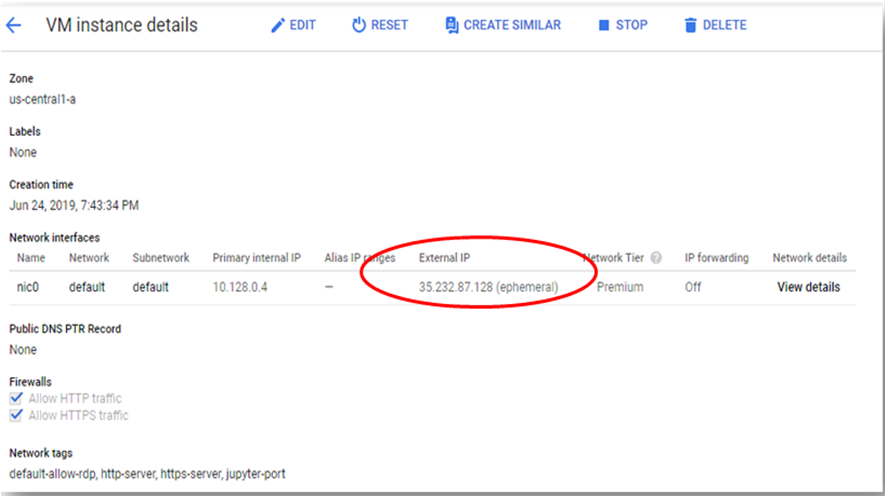
-
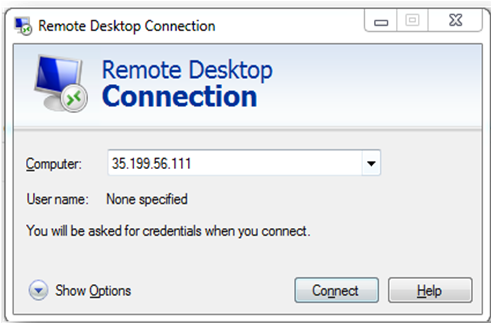
Then From your local windows machine, goto “start” menu, in the search box type and select “Remote desktop connection”
-
In the “Remote Desktop connection” wizard, paste the external ip and click connect
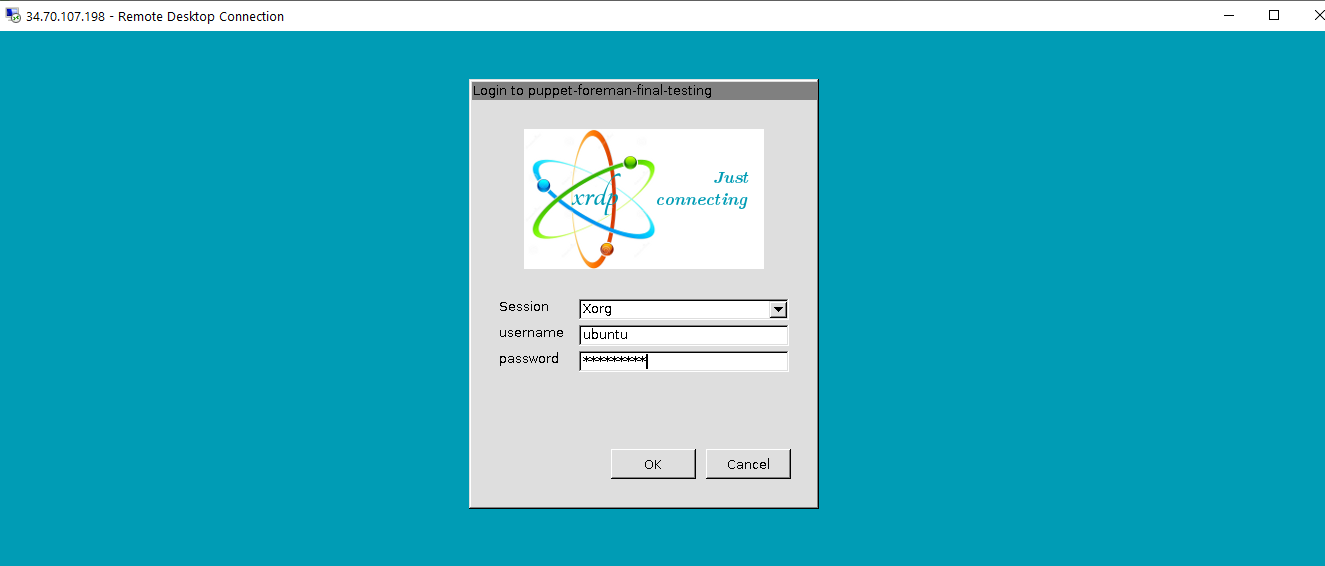
- This will connect you to the VM’s desktop environment. Provide “ubuntu” as the userid and the password set in step 6 to authenticate. Click OK
- Now you are connected to out of box Puppet with Foreman GUI- an alternative to Puppet Enterprise & Puppet Razor environment via Windows machines.
- To connect using RDP via Linux machine, first note the external IP of the VM from VM details page,then from your local Linux machine, goto menu, in the search box type and select “Remmina”.
Note: If you don’t have Remmina installed on your Linux machine, firstInstall Remmina as per your linux distribution.
 14. In the “Remmina Remote Desktop Client” wizard, select the RDP option from dropdown and paste the external ip and click enter.
 15. This will connect you to the VM’s desktop environment. Provide “ubuntu” as the userid and the password set in step 6 to authenticate. Click OK
 16. Now you are connected to out of box Puppet with Foreman GUI- an alternative to Puppet Enterprise & Puppet Razor environment via Linux machine.
- After VM creation, the Puppet & Foreman setup takes 20-30 minutes to complete. To check if the setup is finished, run below command which will show the setup logs. Once the setup is finished, you should see " ### foreman setup completed ### “ at the end of the log.
tail -f /var/log/cloud-init-output.log
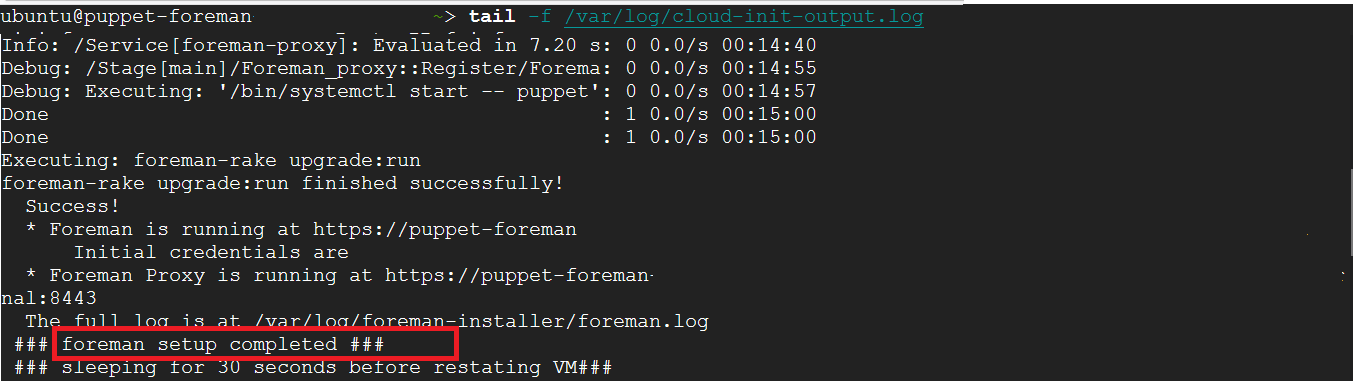
Once the setup completes, VM will restart automatically.
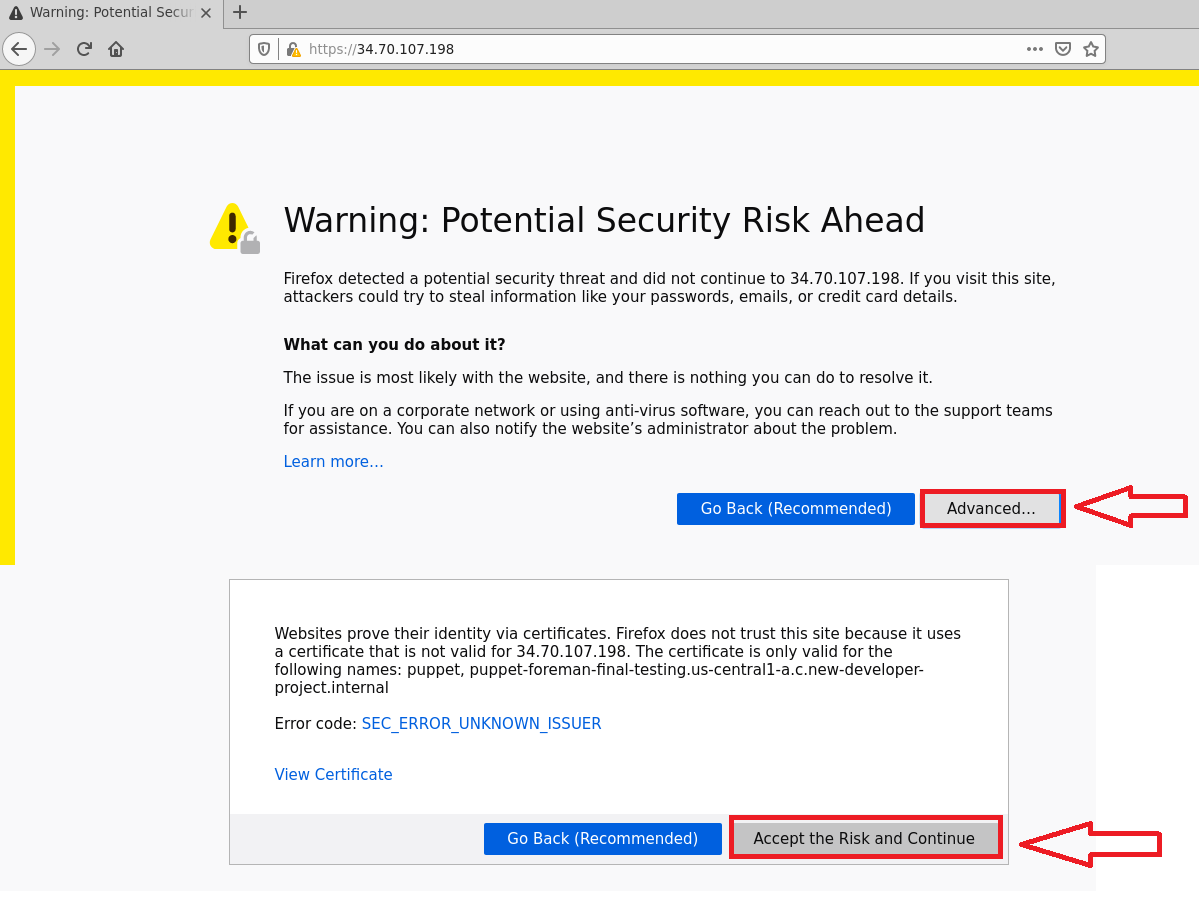
- Once the VM restars automatically after Foreman setup completion, The Foreman console should be up and running. The console can be accessible via https://vm-public-ip . If you don’t want to expose the console on public ip, you can login to the GUI desktop environment as explained above and open the console via https://vm-internal-ip in the firefox browser.
- The login id for console is admin . A random password is generated during setup which can be found by running below command :
**grep foreman::params::initial_admin_password: /var/log/foreman-installer/foreman***


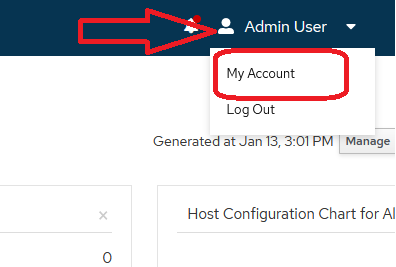
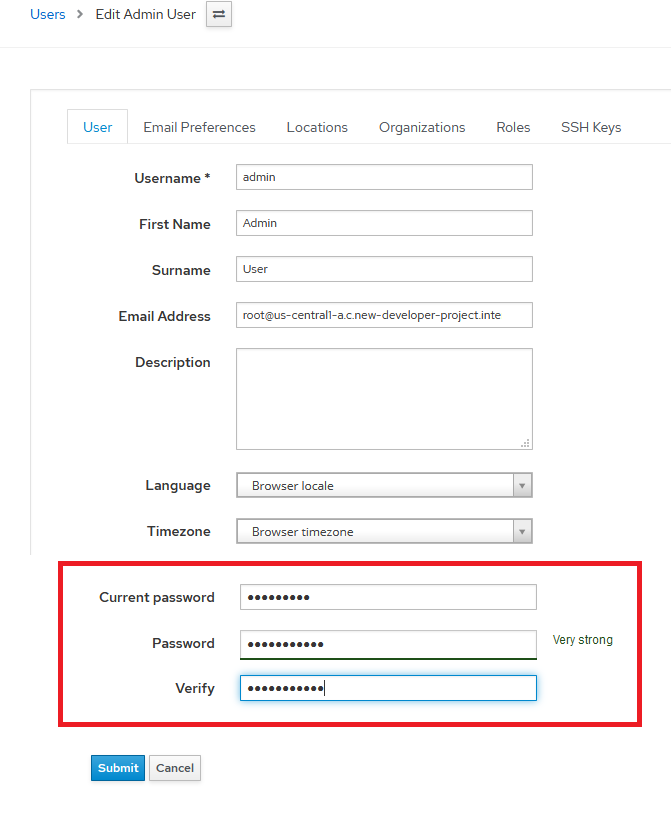
- Once you login, it is highly recommended to change the admin password by going to user profile and resetting the password.
- To change the password, click on Admin user on top-right and select My account option.
- In User tab, enter the current password and then enter new password and submit it.
- If you have exposed the VM on public IP, it is highly recommended to make the IP static in order to keep the same IP over server restarts . Please follow this link to know the steps for making the IP static
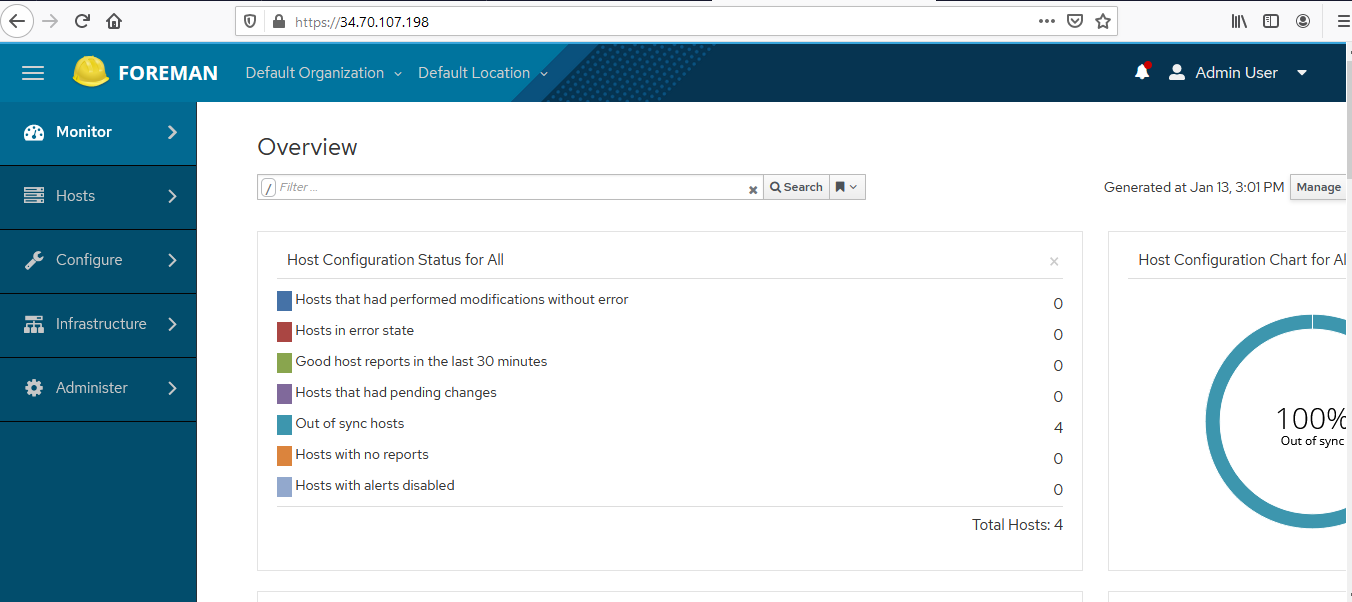
- Foreman console allows you to manage your infrastructure by creating hosts and configuring them as per your requirements. In order to allow host creation and management, Foreman uses following components & concepts :
- Smart Proxy : To orchestrate the process of commissioning a new host and providing API interface . A smart proxy is already created out of box during installation and should be sufficient for your use.
- Compute Resources : Foreman supports creating and managing hosts on a number of virtualization and cloud services including GCP via “Compute Resources” . You will need to create at least one GCP compute resource per region to manage hosts within that region. Steps for creating GCP compute resource are detailed later in the guide.
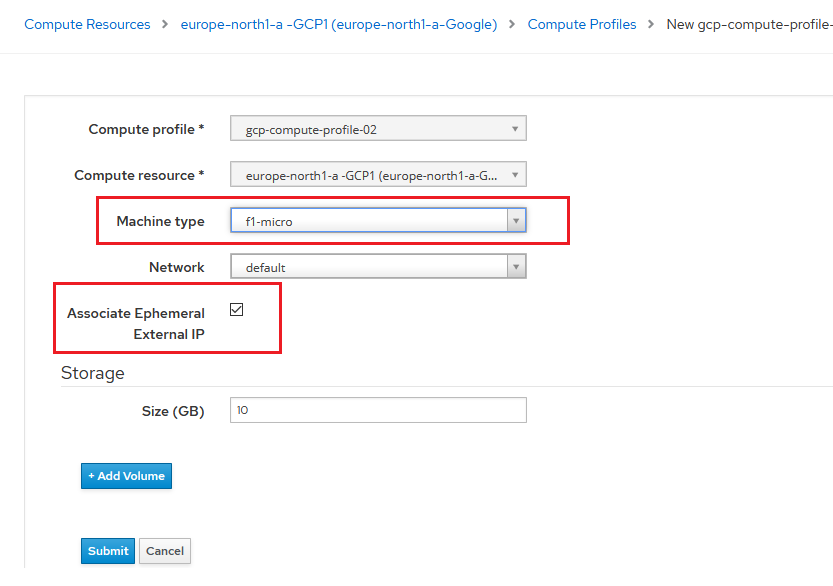
- Compute Profile : A compute profile is linked to a computer resource to help you default certain properties of the compute resources like defaulting the VM size to “f1-micro” . Steps for creating GCP compute profile are detailed later in the guide.
- Creating GCP Compute Resource :
- In GCP console, select the project where Foreman VM is deployed.

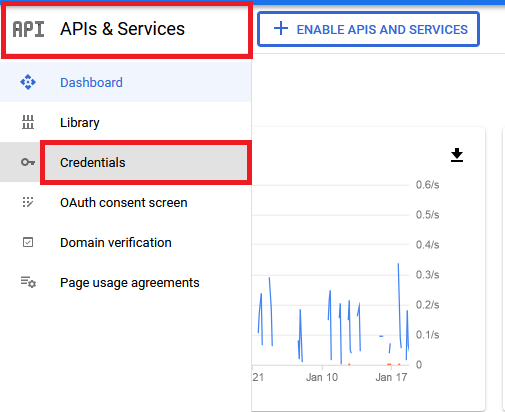
- In GCP console, search for “API & Services” and goto the “API & Services” console, click on “Credentials” from left menu.
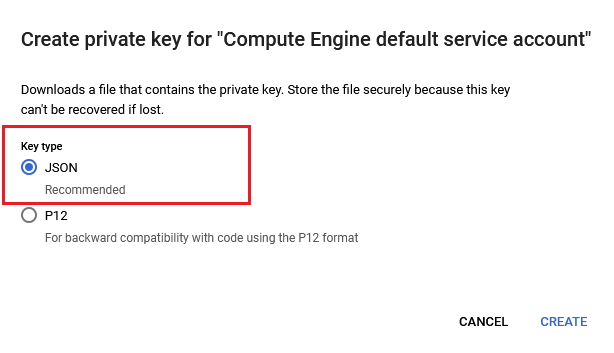
- In the credentials console, click on the default service account, scroll down to the “Key” section click on “Add Key” and select “create new key” and choose “JSON” format and click create.
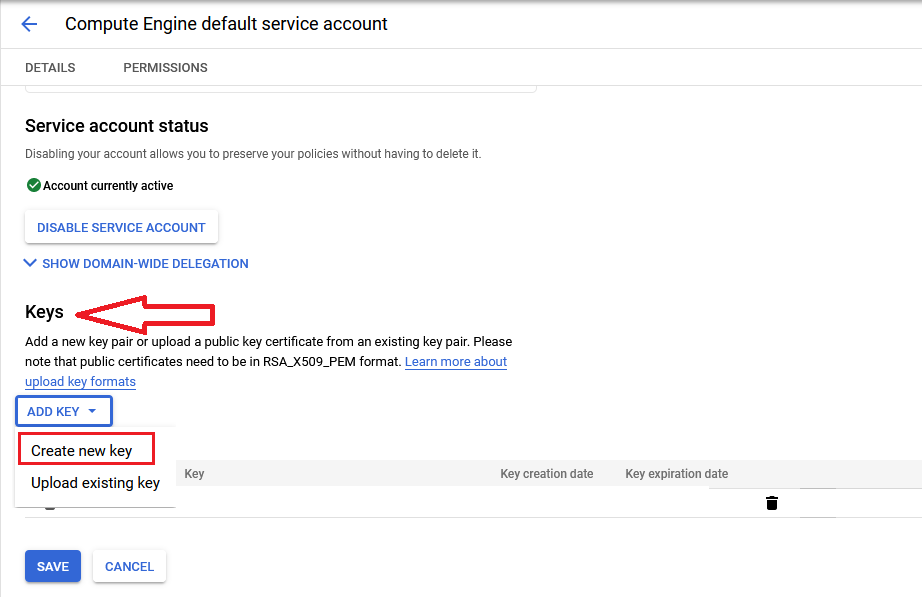
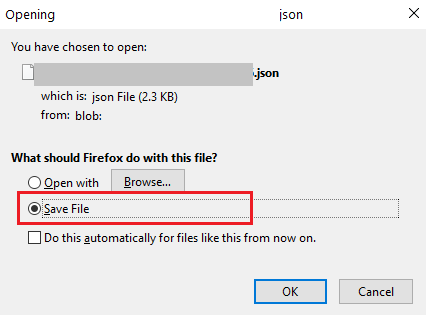
Save the key locally with the name “gce.json”.
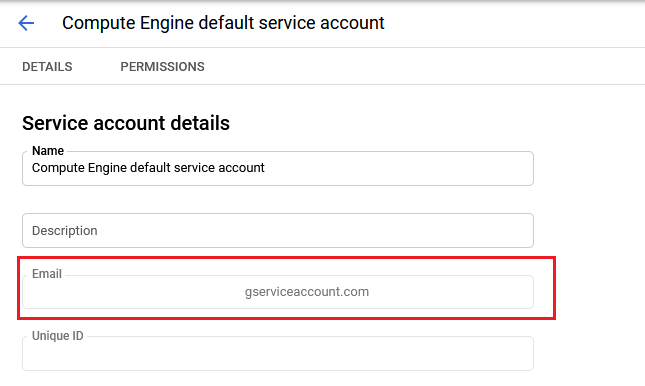
On the same service account page, copy the service account email. Also copy the project ID and keep email and project id handy
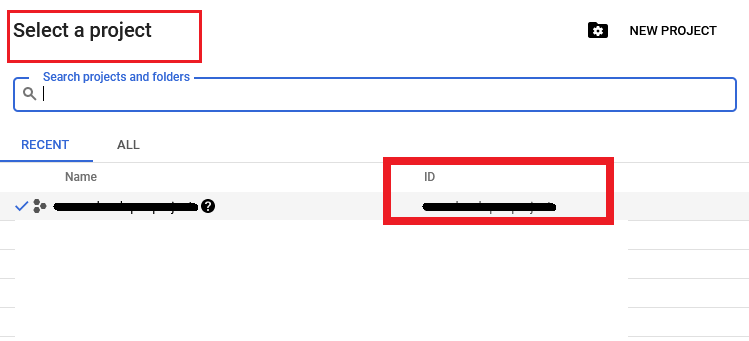
To copy the Project ID, click on Project Name at the top of the gcp console. It will open projects list. Infront of Project Name, Project ID is given. Copy this ID.
- Next, upload the saved key to foreman server at /usr/share/foreman/gce.json
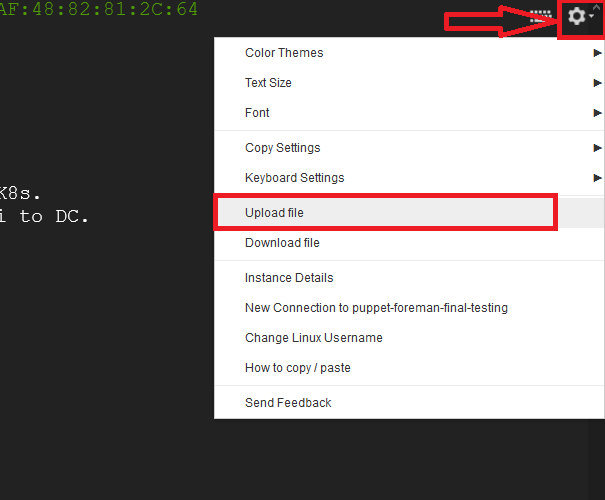
To upload the gce.json file, SSH to puppet-foreman VM as shown in step 4. Click on gear button and select upload file option. Browse your gce.json file and upload it.
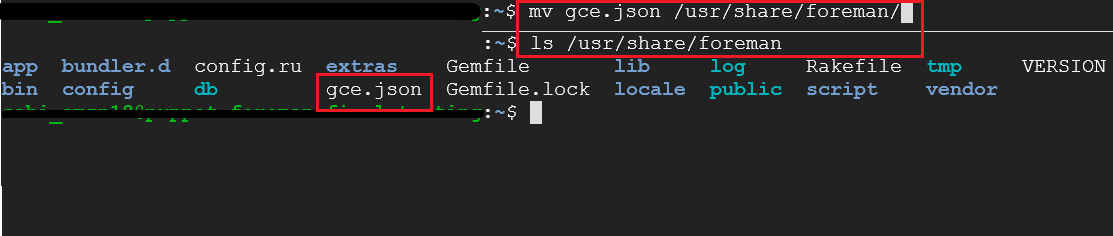
By default it gets uploaded in the home directory. run below command to move it to /usr/share/foreman/gce.json location. once it is moved to the specified location check it using ls command shown below.
mv gce.json /usr/share/foreman/
- Once the key is uploaded to server, it is recommended to delete the local copy for security reasons.
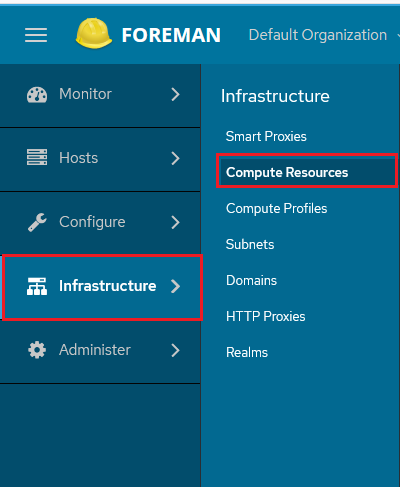
- Now go back to Foreman web console, click on “Infrastructure → Compute Resources” and click on “Create Compute Resources” button.

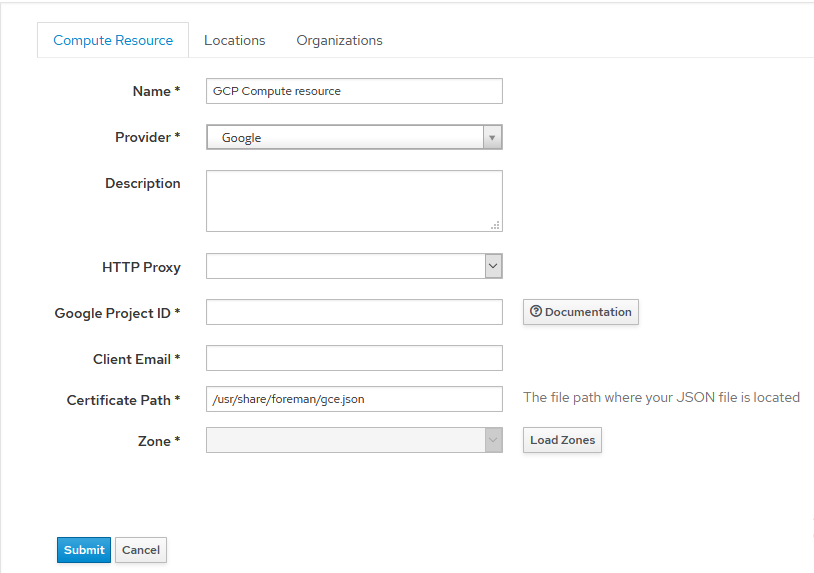
- In the displayed page, select “Google” from provider drop down. If you don’t see “Google” in the provider dropdown, restart the VM and try again.
- Give it suitable Name. e.g. GCP Compute Resource
- Provide the project id copied earlier in Google Project ID and service account email in Client Email fields.
- Set the Certificate Path field to /usr/share/foreman/gce.json
- For Zone, click on Load Zones button and select the zone where you want Foreman to create and manage hosts. Click on Test Connection button to make sure Foreman can connect to the zone.
- Click on Submit . New GCP Compute Resource should get created now.
- Creating GCP Compute Profiles (Optional)
- Creating compute profile is optional . Profile allows you to set default values to various GCP attributes like VM size, network, storage disks etc.
You can create compute profile by following Infrastructure → compute profile → create option

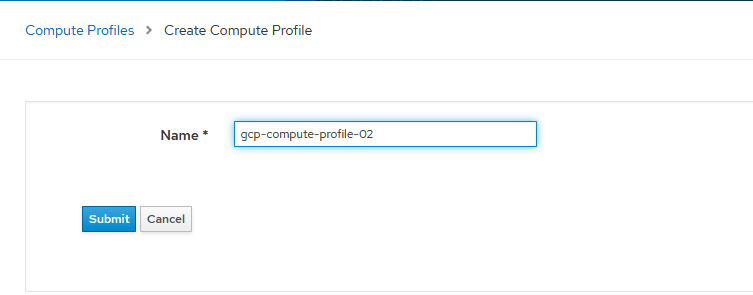
- Give Name to the compute profile and submit it.
- Now select the compute resource you want to edit. You can edit compute resource default VM attributes.e.g changing machine type, assigning Ephemeral External IP etc.
- Now that GCP Compute Resource and profile (optionally) are created, you can manage Puppet hosts with Foreman. Refer to Creating and Managing Puppet Hosts from Foreman for more details