Creating and Managing Puppet Host from Foreman
This section describes how to create and manage puppet host from foreman.
Note: : It is assumed that you have followed the getting started guide and created Compute Resources for your respective cloud platform. Compute Profile is a prerequisite for this guide
Foreman allows you to create and manage hosts from its console. In addition, if you have existing Vms or puppet hosts which you want to manage via Foreman, you can do so by integrating the existing hosts to Foreman server. Follow this guide to understand steps for both these scenarios.
- Creating host from Foreman console
- Login to Foreman console
- Onetime configuration changes : Below onetime configuration changes are required to avoid mismatch between Foreman generated hostname and VM name generated by your cloud provider.
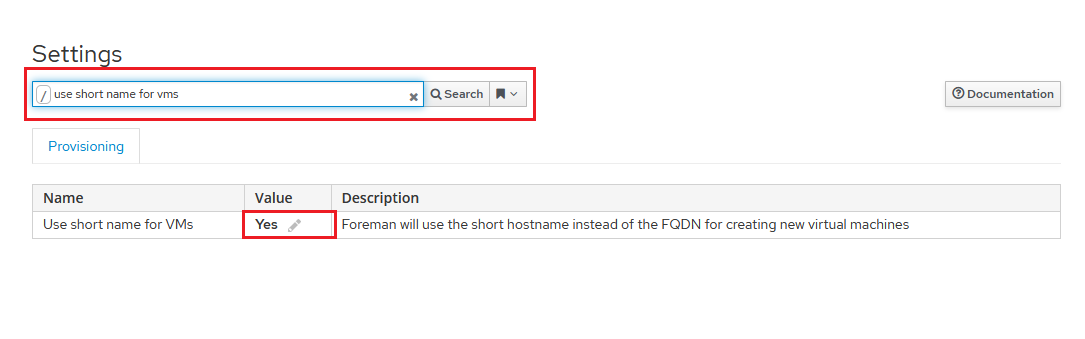
In Foreman console, goto Administer → Settings and goto Provisioning tab

Search for Use short name for Vms property and change the value to yes, and save the settings
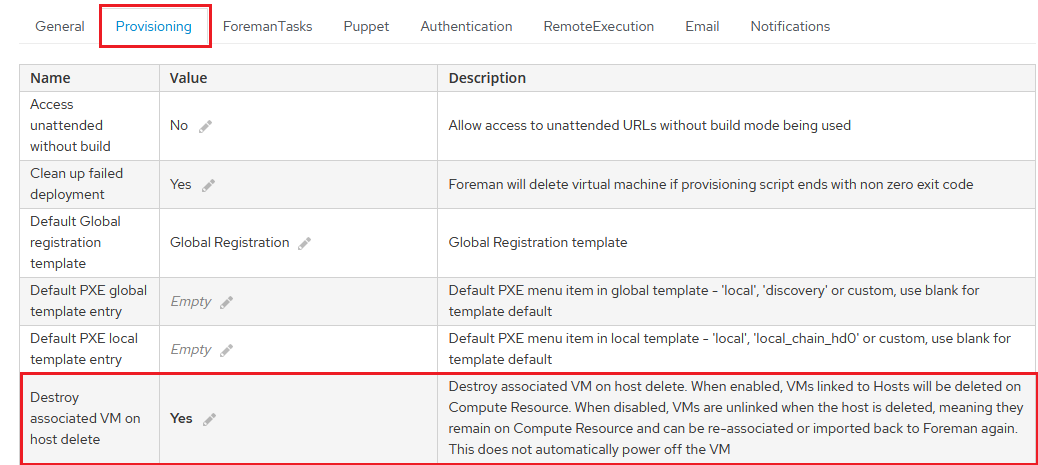
- (Optional) : When deleting created hosts, if you want the associated VM to be deleted, you can set Destroy associated VM on host delete to yes under provisioning.
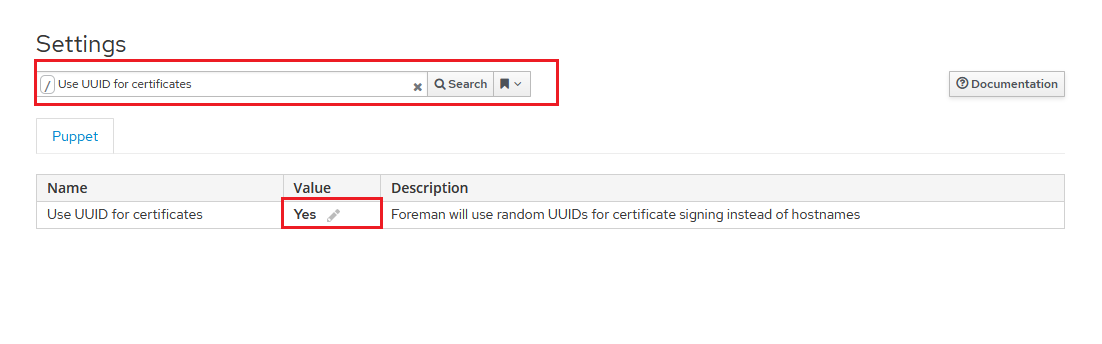
Next, goto Puppet tab and search for Use UUID for certificates and edit the value to Yes
- Before you can create and manage host, you need to create an Operating System image, associate it with existing or new Operating System and associate the OS with a “Provisioning Template” of type “Finish” . For simplicity, this guide will use the out of box OS, images and provisioning templates created by the Foreman setup. Once you get familiarized with the process, you can then create your own image, OS and provisioning templates.
- Associating provisioning template with OS :
- Foreman comes with predefined ruby based templates for host creation.
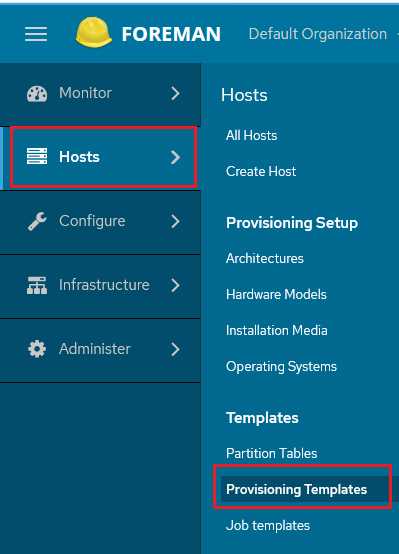
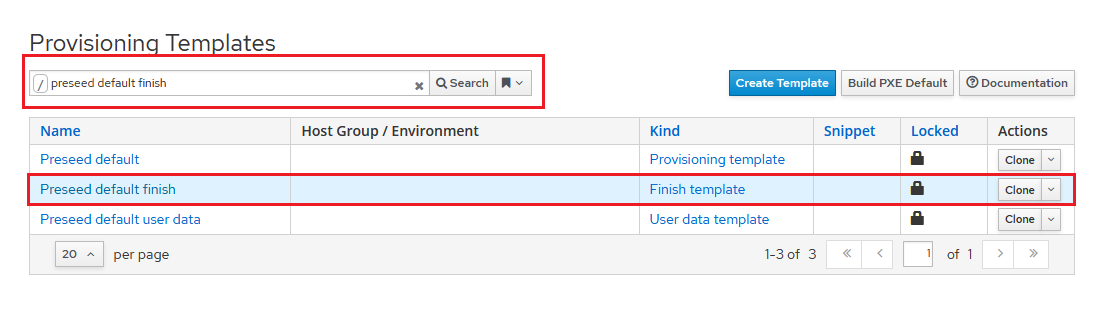
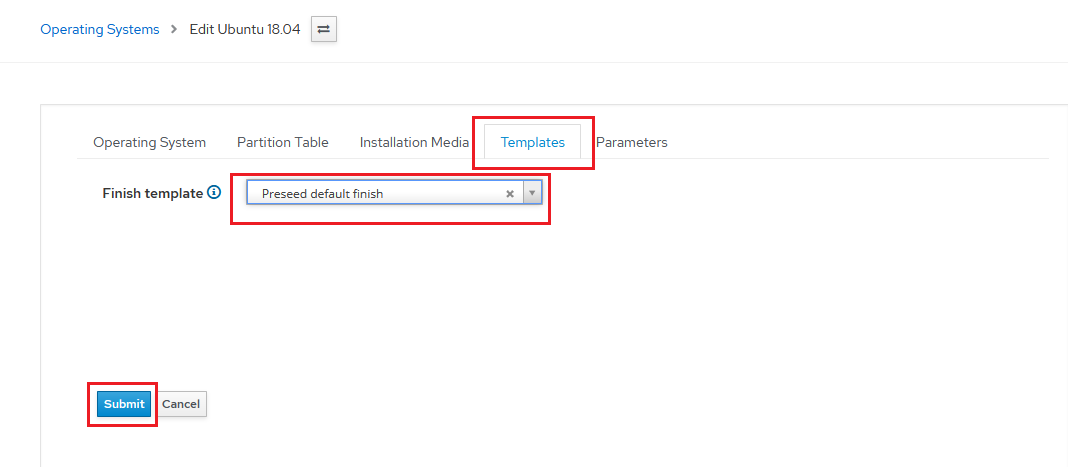
- To associate template with OS, go to Host → Provisioning Template, search and open Preseed default finish template
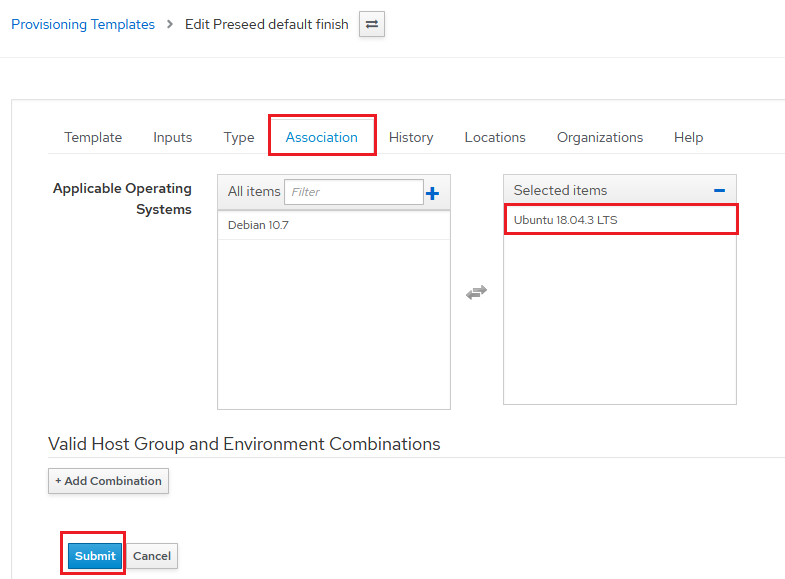
- On the template page, goto Association tab and add Ubuntu OS from All items to Selected Item box and click Submit
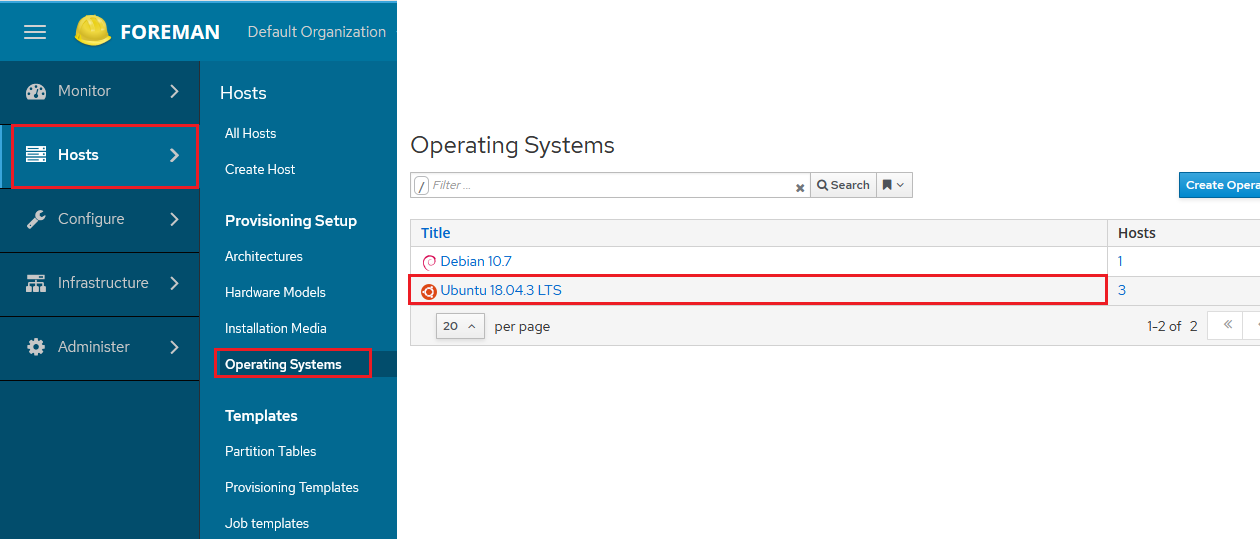
- Now go to Host → Operating System and click on Ubuntu Operating system
- In the displayed page, go to Template tab and select Preseed default finish from Finish template dropdown, click submit.
- Associating OS image with OS
- Similarly, you need to associate the OS image which will be used to create the host with OS
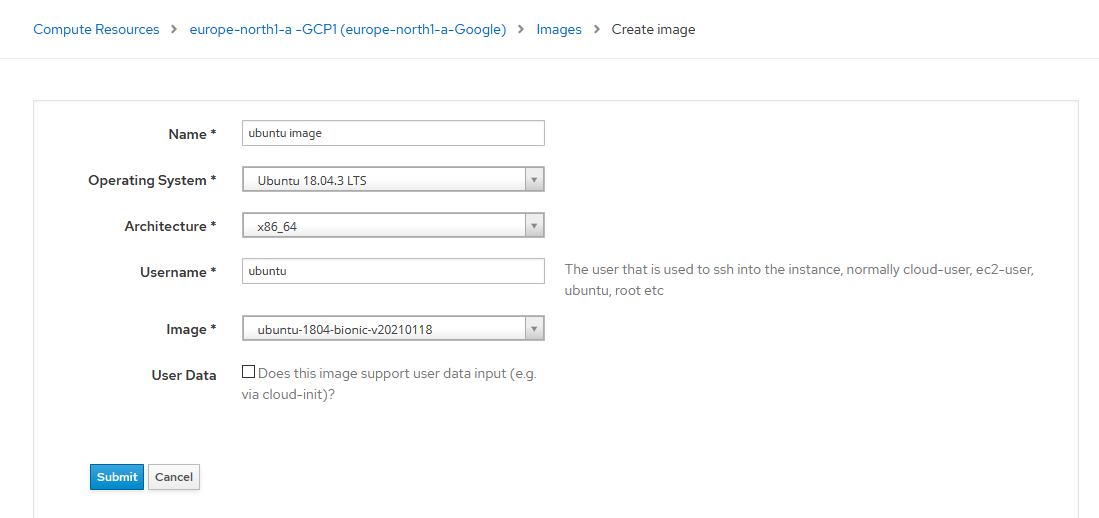
- Goto Infrastructure → Compute Resource and select your compute resource you created earlier
- In the resource page, go to images tab and click on create image button on top right

- In the create image page, provide the image name (eg. Ubuntu image), keep the default values for Operating System, architecture and change username to ubuntu
- In the image dropdown, select the Ubuntu image matching your Operating System (eg. Ubuntu-1804) and click on Submit
- Creating Host
- Now that template, images and OS are associated, you can create the host
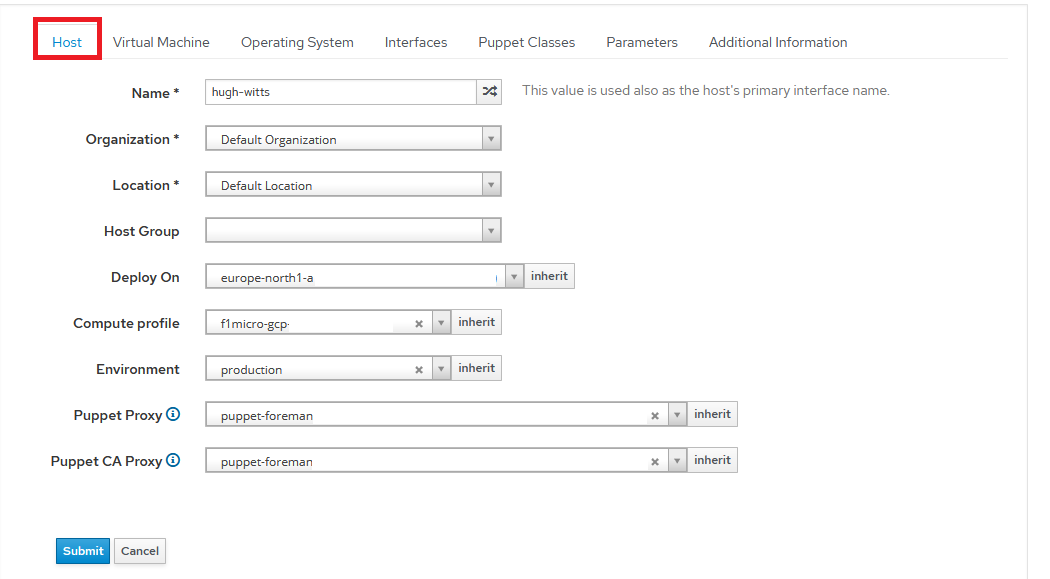
- In the Foreman console click on Hosts → Create Host
- In the displayed page, under Host tab, provide name for the host . Make sure you don’t give long name for host and the hostname has maximum one hyphen (“-”) . The domain name is added to host name for a fully qualified name and if the host name is long, you may get Invalid value for field ‘resource.name’ error during host creation. If you happen to get this error after submission, simply shorten your host name and retry.
- For Deploy On, select the Compute Resource you created earlier
- If you had created a Compute Profile, select it from dropdown as well. The values for VM size, network interface etc. will be defaulted to the values of selected compute profile. You can override the default values in Virtual Machine tab if required.
- Select the available values for Environment, Puppet Proxy and Puppet CA Proxy from the dropdown
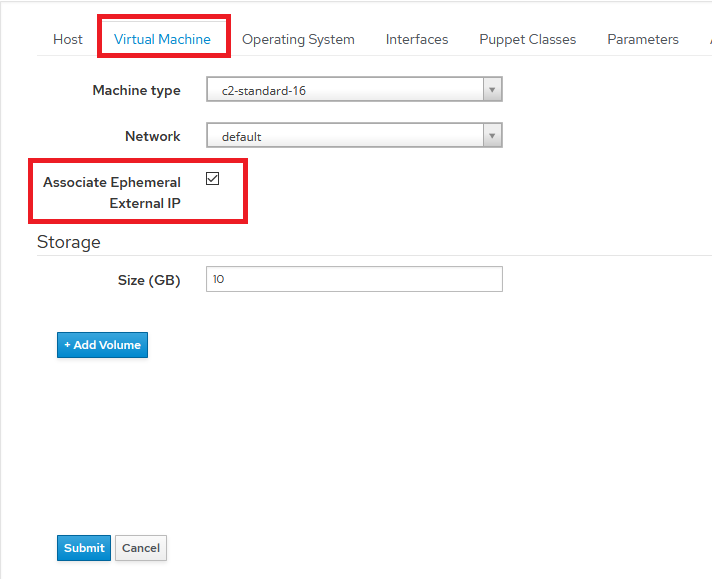
- In the Virtual Machine tab
select Machine type and Network where you want to deploy the host .
Check the box next to Associate Ephemeral External IP This will assign a public IP to the host VM and required to download and install puppet agent. If you don’t associate public IP, puppet agent will not be installed and Puppet server won’t be able to receive reports and manage the agent. If you don’t want host VM on public IP, you can disable the public IP after host creation or create the host manually and then associate it with Foreman server. See Associating existing host with Foreman section for details .
Optionally add additional data volume if needed
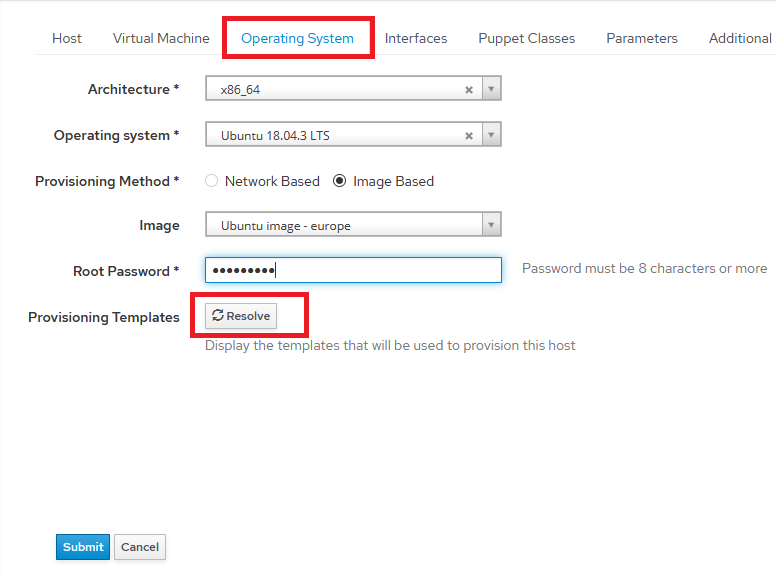
- Next, goto Operating System tab, select x86_64 as architecture, select available value for Operating System, keep provisioning method to Image Based, select available image from dropdown, provide root password (meeting the password policy requirements of your cloud provider) and finally click Resolve button. This will resolve the provisioning template based on the selected OS. If you get error in resolving template then revisit the template and image association steps. The Resolve step should be successful in order to provision the host.
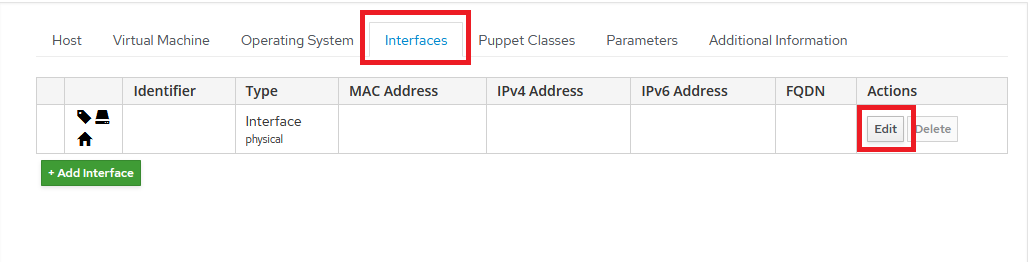
- Now go to Interfaces tab, there will be an existing network interface, click on Edit button in the last column named Action and in the displayed page, select the available value for Domain . Make sure that the IPv4 Address and IPv6 Address fields are empty after selecting Domain.
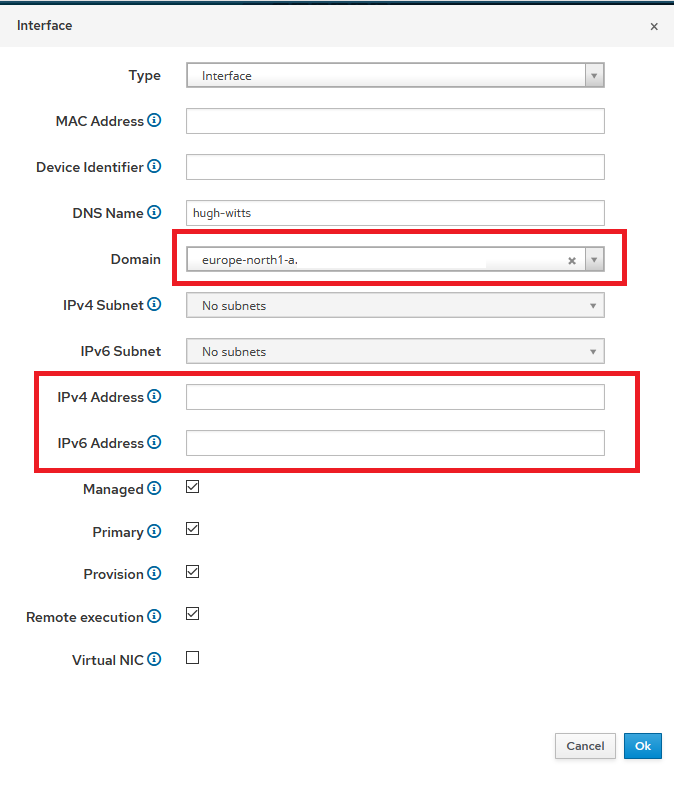
Note: Foreman will automatically create network domain for each of the network interface/zone linked with created “Compute Resource” . If you have created multiple compute resources in different zones, you will see multiple domains in interface edit form dropdown. Make sure you select the right domain corresponding to compute resource selected for the host.
- Goto Parameters tab and add below parameters under Host Parameters
- ▪ Parameter name : enable-puppetlabs-puppet6-repo
- ▪ type : boolean
- ▪ value : true
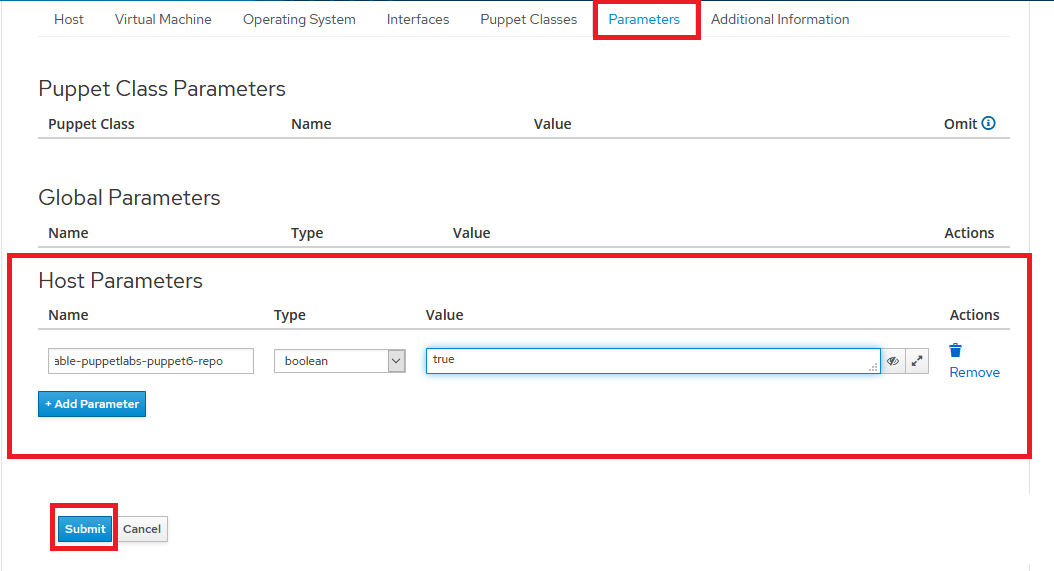
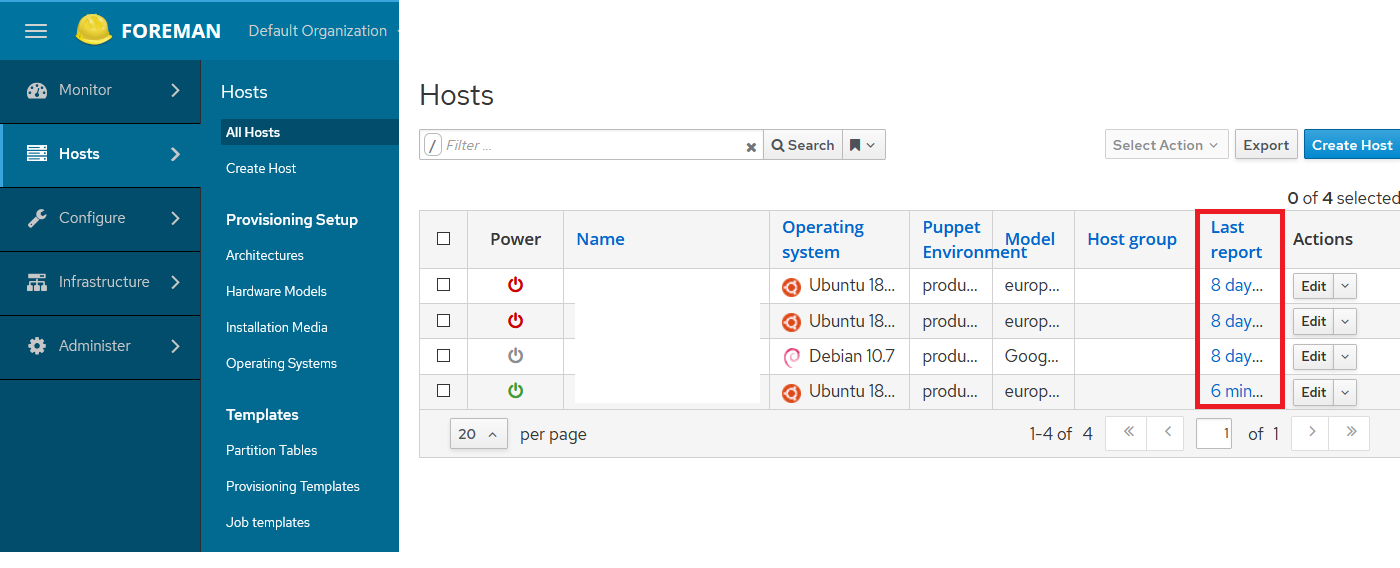
- Now click Submit button . The host provisioning will start. You may see Proxy Error message after sometime.
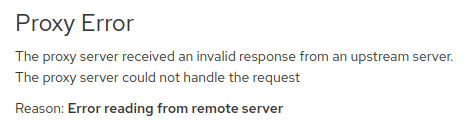
- If you get above error, goto Hosts → All Hosts and verify if the host you were trying to create is listed in the hosts list . If the host is listed and the Last Report column has values for the newly created host, you can ignore the error. To be on the safe side, wait 2-3 minutes and refresh the hosts list to confirm if the new host is able to send the report in case Last Report column is empty
- If you come across any additional issues, refer to Troubleshooting issues section.
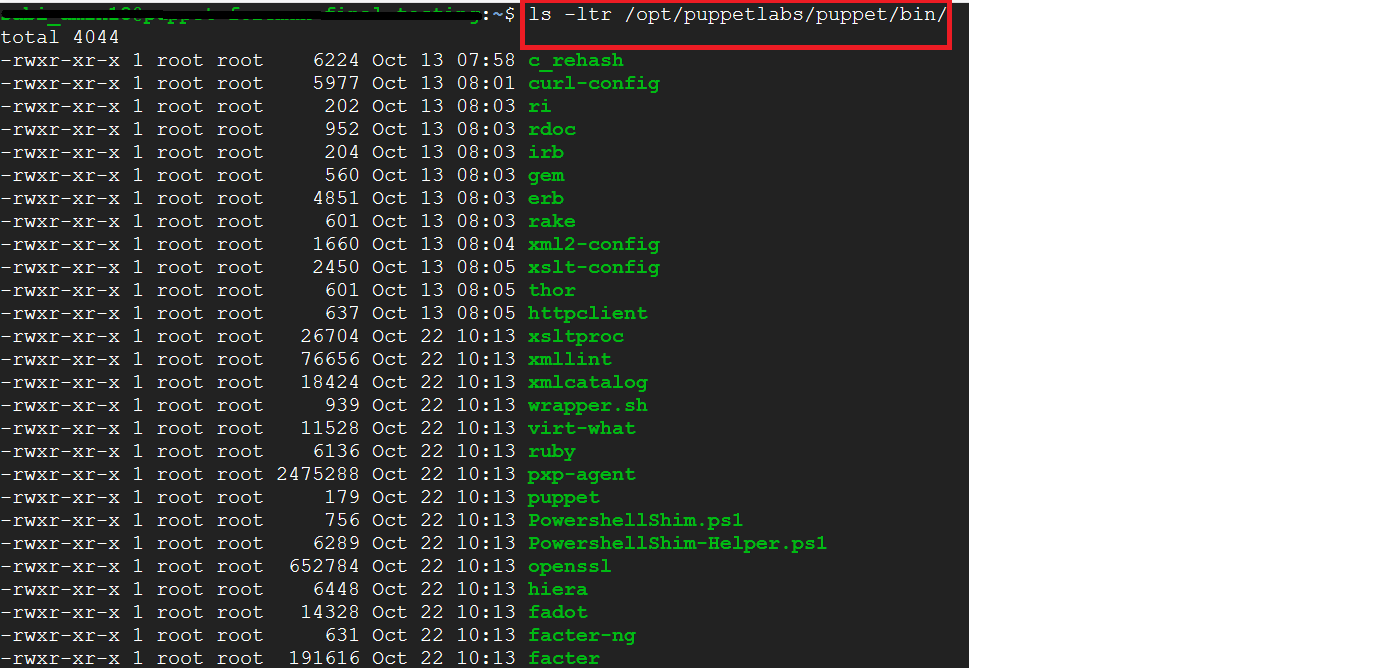
- Optional Steps : Note that in the newly created host, puppet agent binaries are installed at /opt/puppetlabs/puppet/bin/ . If you are going to run puppet agent commands on host, you can add above location to your path variable by editing /etc/environment file.
ls /opt/puppetlabs/puppet/bin/
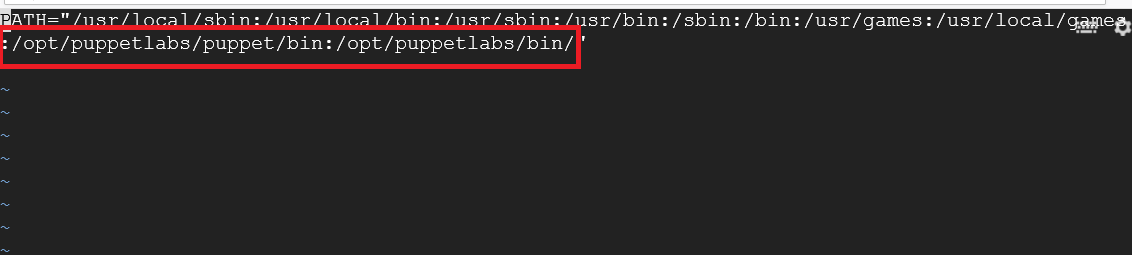
- To add puppet binaries location to /etc/environment, Open environment file as shown below-
sudo vim /etc/environment

- append puppet binaries path at the end of the file seperated by colon (:) as shown below
:/opt/puppetlabs/puppet/bin:/opt/puppetlabs/bin/
- Associating existing host with Foreman
To associate existing host to Foreman, you need to have puppet agent with the version compatible with puppet server version. Assuming that there is no puppet agent installed on the hosts, below are the steps
- Login to host and download the puppet setup
Download puppet setup as per your host OS :
wget https://apt.puppet.com/puppet6-release-focal.deb
wget https://apt.puppet.com/puppet6-release-bionic.deb
wget https://apt.puppetlabs.com/puppet6-release-xenial.deb
wget https://apt.puppetlabs.com/puppet6-release-buster.deb
wget https://apt.puppetlabs.com/puppet6-release-stretch.deb
-
#for other host OS,
goto https://apt.puppet.com/, identify the right setup for the OS and download it using wget.
-
Once setup is downloaded, install the same using below commands . Make necessary changes as per your setup name:
sudo dpkg -i puppet6-release-bionic.deb
sudo apt install puppet-agent
- puppet binaries will be installed under /opt/puppetlabs/puppet/bin . You can have the location added to PATH variable by adding the location to /etc/environment file. You can run below command to verify the installed version :
/opt/puppetlabs/puppet/bin/puppet –version
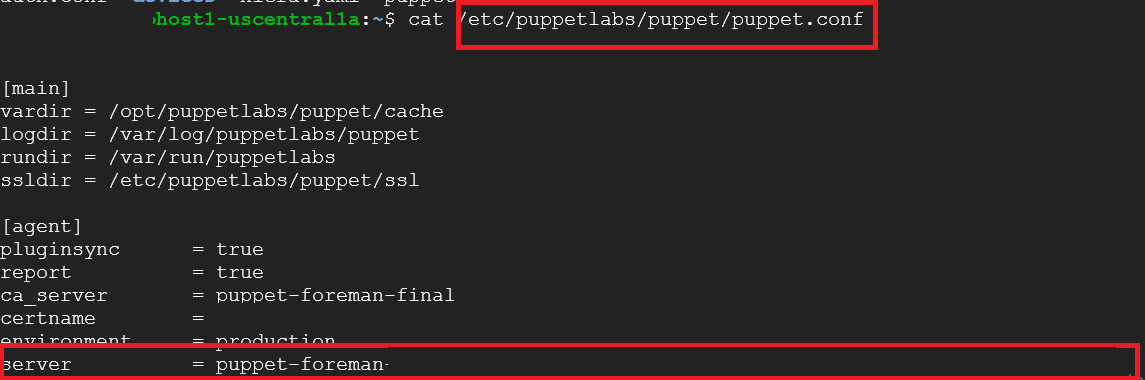
- Once puppet agent is installed, the puppet server name needs to be added in puppet.conf file. For this, goto Foreman VM and run
to get fully qualified name of server, next on the agent VM, add below line to /etc/puppetlabs/puppet/puppet.conf file
server = your_puppet_server_hostname
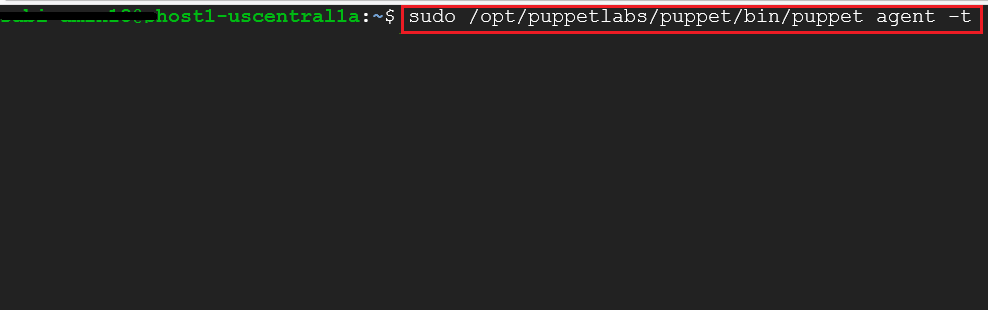
- Now run below command in the host to connect to the server:
sudo /opt/puppetlabs/puppet/bin/puppet agent -t
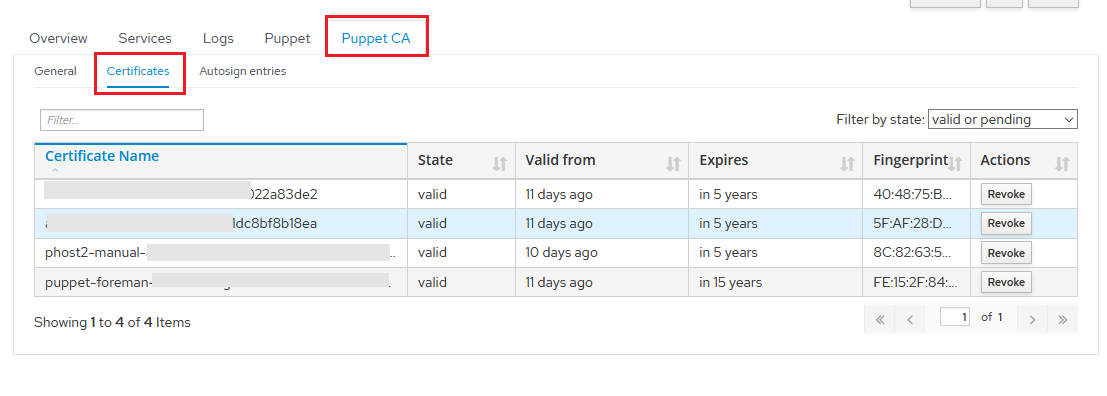
- Finally, you need to accept the agent certificate in Foreman by following below steps:
- Goto Infrastructure → Smart Proxies and select the proxy.
- In proxy page, goto Puppet CA tab, then goto Certificates tab within Puppet CA
- The host certificate will be listed with pending status . Click on sign button in the right for the pending certificate.
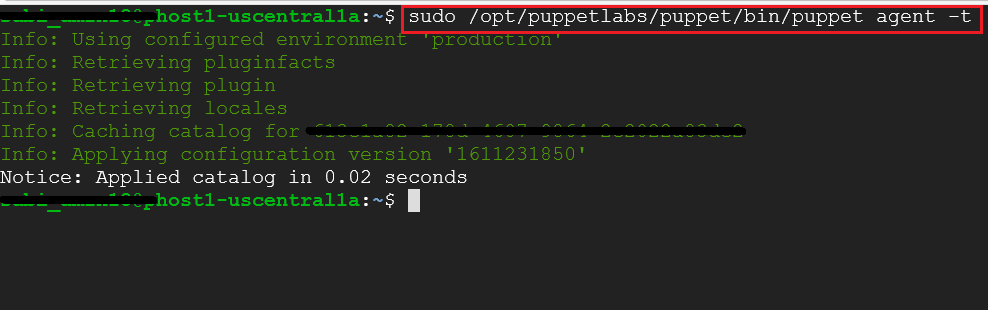
- Once the certificate is signed, go back to host and rerun below command -
sudo /opt/puppetlabs/puppet/bin/puppet agent -t
- Now the host should be listed in Hosts → All Hosts table in Foreman console. You may need to wait few minutes to get the host status updated in the table. 7. Copying Public SSH key to host:
In order for Foreman to manage host, Forman public SSH key needs to be copied to host . Before copying key, get the Foreman proxy name by going to Infrastructure → Smart Proxies and copy the proxy name, then run below commands on host :
curl -k https://your-foreman-proxy-name:8443/ssh/pubkey > ~/.ssh/authorized_keys
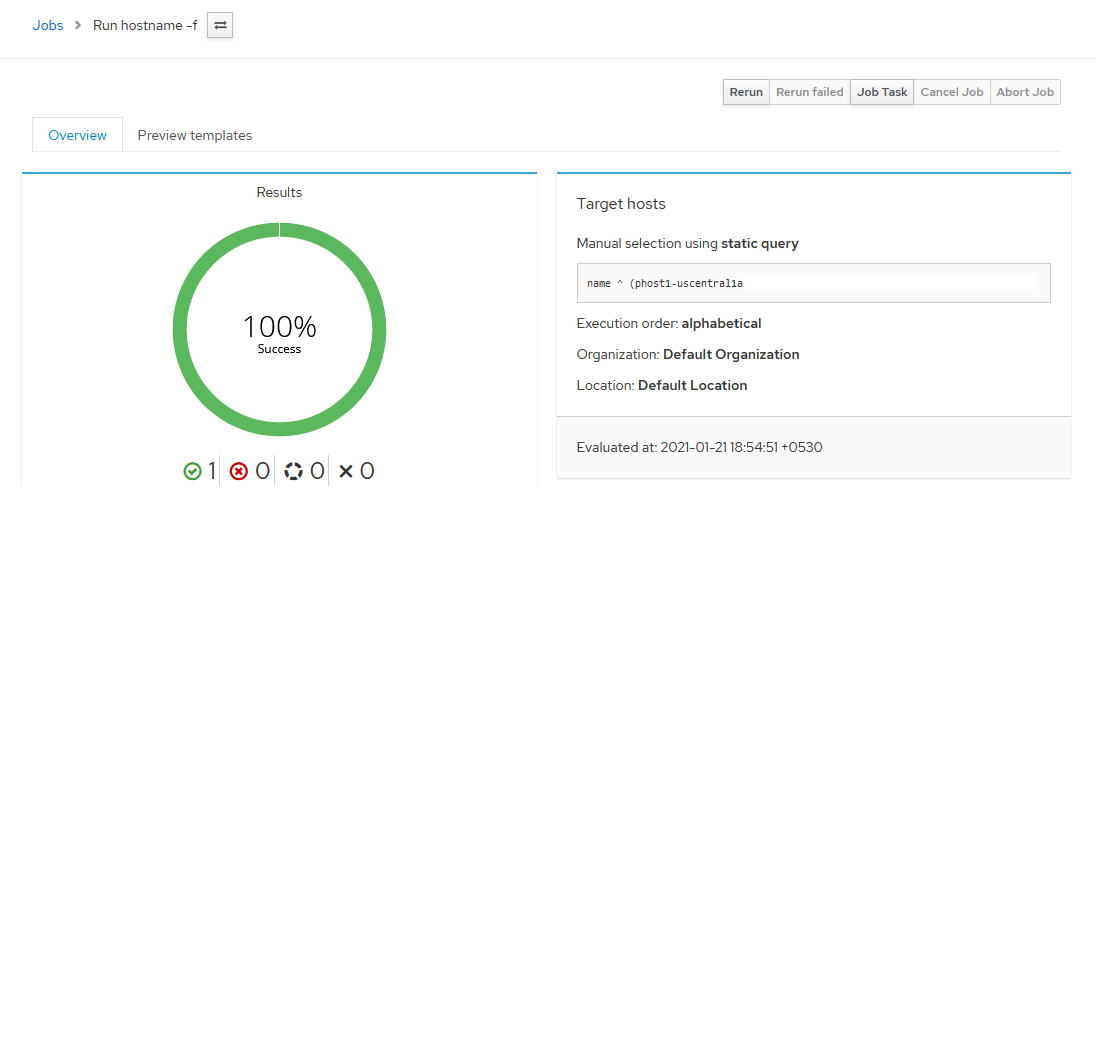
- To verify if the keys are copied and you can manage the host, you can run simple remote command from Foreman by following below steps:
- Goto Hosts → All Hosts and select the check box next to the host
- A Select Action button will appear on top right of the hosts table. Select the Schedule Remote Job option from the action list
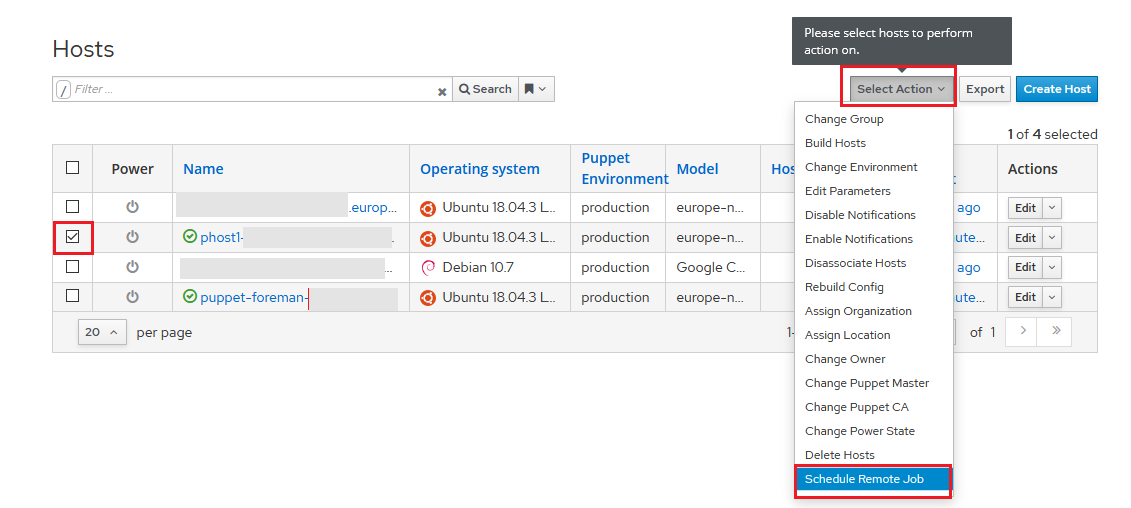
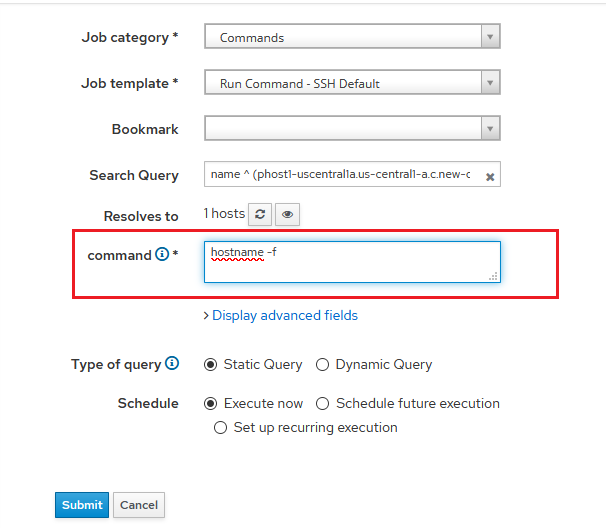
- In the displayed form, keep the default values and copy hostname -f in command text box, click submit.
- If the command executes remotely in the host then the keys are copied successful